This is sort of a tip I guess. It’s a big tip, though.
So yesterday I was thinking that despite its simplicity to me, other people may like to know how I build all of the underwater domes so that they can make one. Now I have no idea if anyone actually wants to make one, but if you do I think you should try out my method because it works well for me. It isn’t a perfect method, and it does take some time (maybe even a few lives, too), but it works.
Now there are three sizes that I have made in my underwater city in Kool-Craft.
Small:
- Diameter of 16 blocks
- 7 blocks high
- 276 blocks of glass (A little less than four and a half stacks)
- Good size for a garden, poor size for a house though
Medium:
- Diameter of 22 blocks
- 9 blocks high
- 484 blocks of glass (A little more than seven and a half stacks)
- Decent size for a house
Large:
- Diameter of 28 blocks
- 11 blocks high
- 748 blocks of glass (More than 11 and a half stacks)
- Good amount of room, perfect for a bigger house
Obviously, the bigger the dome, the more resources and time required to make them. And if you are building it underwater, the more water you need to drain from the dome after it is complete.
So, now I will show you how I make a large-sized dome. The creation of each dome is the same except for how wide and how high you make it. Watch and learn my friends. And as I said yesterday, if you have any suggestions on how to make this run smoother please let me know, I would appreciate any advice/feedback.
You can make a dome underwater or on dry land if you wish. Underwater looks cooler, but above ground takes much less time.

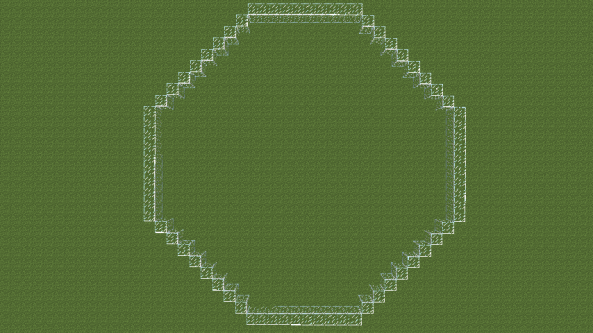
You are trying to make a circle, as close as circles come in Minecraft anyway. So the straight lines and the diagonal lines should each be 10 blocks long. Hope that makes enough sense.

I suppose it isn’t so much a circle. But it is an octagon, or a stop sign if you would prefer to look at it that way. Close enough though.

Now the slightly trickier part is making the octagon slightly smaller with each level. I recommend having a good supply of dirt on hand while making the dome.
By the way, another important thing to remember when making an underwater dome is that you should have a “breathing room.” Make a small room underwater where you can go take a breathe when you are running out of air bubbles. It’s either that or drowning.

That is how you start the next level. Don’t remove the dirt yet, though, it is important for the next level (it makes it easier if you keep it).

Do that on all four corners, and connect them. You’ll understand more when/if you actually build it.
I may do a video on this one day. We’ll see.

Now here is where the dirt comes into play. Place glass on top of the dirt blocks, and then connect the octagon again. Piece of cake!
Do that process 3 more times.
If you are making this dome above ground then you are done. Now you can build. But if you are building underwater then you muse drain the inside of the dome. I’ll be honest with you, this part sucks.

Imagine that this place is full of water right now. I recommend draining the dome (filling it up with dirt) one level at a time. Now only will you remain organized, but you will gain more breathing room as time goes on, and it will get somewhat easier.

You now have breathing room. Now each level down requires more dirt to fill it up. You may have to use other resources to complete this task. But you probably shouldn’t use sand or gravel as gravity affects them.

And there you go. This is what an underwater dome should look like when it is completed. Now for the real fun part, building a house or whatever.
That’s how it’s done guys. Let me know about any other ways I could go about doing this and have fun. I hope this was helpful. Thanks for reading and Happy Mining!


what is the ip 4 a survival life and also what website do you get your texture packs
also really cool dome
Thanks. Do you mean what is the seed for a survival life, because it is not a server. And I use the default texture pack and Tyler uses SMP Revival which you can download here. Thanks for checking out our blog!